一、编译安装
Quantum Espresso 可以通过命令一键安装:sudo apt install quantum-espresso
这里提供源文件的安装方法,文件结构会更清晰一些。使用的是 gfotran 编译,本篇的编译安装的部分参考这个链接:https://www.youtube.com/channel/UCgQPek4ZSo_yL7wEjIhxvfA/playlists。
具体步骤:
1. 下载 .tar.gz 源文件:http://www.quantum-espresso.org/,解压压缩包:tar -zxvf qe-7.3.1-ReleasePack.tar.gz
2. 安装基础环境:
- 安装 gfortran:sudo apt install gfortran
- 安装 git:sudo apt install git
- 安装 make:sudo apt install make
- 有可能还需要安装一些其他的环境(如果编译过程有报错,可以试着安装解决):apt install cmake libopenmpi-dev libfftw3-dev libblas-dev liblapack-dev libhdf5-dev
3. 编译:
(1)仅串行编译(可以直接使用后面的 MPICH 并行编译):
- 配置:./configure,提示配置成功
编译所有:make all (仅编译pw:make pw) - 进入文件夹:cd test-suite/
串行测试:make run-tests-pw-serial(中途可Ctrl+C中断)
(2)使用 MPICH 并行编译:
- 提前安装好MPICH:sudo apt install mpich
测试:mpif90 -v
之前如果有串行编译过,则需要清除编译文件,仅保留源文件,命令为:make clean - 配置:./configure 或 ./configure -enable-parallel ,提示配置成功
编译所有:make all (仅编译pw:make pw) - 进入文件夹:cd test-suite/
串行测试:make run-tests-pw-serial(中途可 Ctrl+C 中断)
并行测试:make run-tests-pw-parallel(中途可 Ctrl+C 中断) - 串行运行:/opt/qe-7.3.1/bin/pw.x < test.in > test.out
并行运行:mpirun -np 4 /opt/qe-7.3.1/bin/pw.x < test.in > test.out
特别说明:make 编译的时间可能会有点长,可能会超过一个小时,需要耐心等待。可以通过命令放置于后台运行:nohup make all & 。使用 ps -ef|grep make\ all 命令查看是否编译完成,或者查看 nohup.out 文件来判断。
补充说明:如果安装了 gfortran,但 mpif90 -v 和 ./configure 时仍然找不到 gfortran,这可能是由于安装了 anaconda 的原因,conda 环境中的 gfortran 抢占了 sudo apt 安装的 gfortran,但版本好像不对,导致报错。目前个人的解决方案是:将 ~/.bashrc 中的 conda 环境变量注释后(类似于卸载anaconda),再继续安装 Quantum Espresso。安装完后再把 conda 的环境变量恢复。
添加环境变量:(1)方法一(推荐):编辑 .bashrc 文件,添加内容:export PATH=/opt/qe-7.3.1/bin:$PATH ,保存后输入命令更新:source .bashrc 。(2)方法二:编辑 /etc/environment 文件,在最后的引号前添加对应的路径,系统重启。
4. 运行命令示例:
- 串行运行:/opt/qe-7.3.1/bin/pw.x < si.scf.in > si.scf.out
- 并行运行:mpirun -np 4 /opt/qe-7.3.1/bin/pw.x < si.scf.in > si.scf.out
使用脚本 a.sh 提交任务并行运行:
#!/bin/sh
#PBS -N task
#PBS -l nodes=1:ppn=4
export OMP_NUM_THREADS=4
mpirun -np 4 /opt/qe-7.3.1/bin/pw.x < si.scf.in > si.scf.out
如果是 pw.x 已经添加到环境变量中,则 pw.x 可以直接执行:
- 串行运行:pw.x < si.scf.in > si.scf.out
- 并行运行:mpirun -np 4 pw.x < si.scf.in > si.scf.out
使用脚本 a.sh 提交任务并行运行(已配置环境变量):
#!/bin/sh
#PBS -N task
#PBS -l nodes=1:ppn=4
export OMP_NUM_THREADS=4
mpirun -np 4 pw.x < si.scf.in > si.scf.out
5. 更多赝势下载:https://www.quantum-espresso.org/pseudopotentials/。
二、具体例子
这里的例子参考这个链接:https://pranabdas.github.io/espresso/hands-on/bands
pw.scf.silicon_bands.in 输入文件(需要修改赝势文件位置):
&CONTROL
  calculation = 'scf',
  restart_mode = 'from_scratch',
  prefix = 'silicon',
  outdir = './tmp/'
  pseudo_dir = '/opt/qe-7.3.1/pseudo'
  verbosity = 'high'
/

&SYSTEM
  ibrav =  2,
  celldm(1) = 10.2076,
  nat =  2,
  ntyp = 1,
  ecutwfc = 50,
  ecutrho = 400,
  nbnd = 8,
!  occupations = 'smearing',
!  smearing = 'gaussian',
!  degauss = 0.005
/

&ELECTRONS
  conv_thr = 1e-8,
  mixing_beta = 0.6
/

ATOMIC_SPECIES
  Si 28.086 Si.pz-vbc.UPF

ATOMIC_POSITIONS (alat)
  Si 0.0 0.0 0.0
  Si 0.25 0.25 0.25

K_POINTS (automatic)
  8 8 8 0 0 0
运行命令:pw.x < pw.scf.silicon_bands.in > pw.scf.silicon_bands.out
pw.bands.silicon.in 输入文件(需要修改赝势文件位置):
&control
  calculation = 'bands',
  restart_mode = 'from_scratch',
  prefix = 'silicon',
  outdir = './tmp/'
  pseudo_dir = '/opt/qe-7.3.1/pseudo'
  verbosity = 'high'
/

&system
  ibrav =  2,
  celldm(1) = 10.2076,
  nat =  2,
  ntyp = 1,
  ecutwfc = 50,
  ecutrho = 400,
  nbnd = 8
 /

&electrons
  conv_thr = 1e-8,
  mixing_beta = 0.6
 /

ATOMIC_SPECIES
  Si 28.086  Si.pz-vbc.UPF

ATOMIC_POSITIONS (alat)
  Si 0.00 0.00 0.00
  Si 0.25 0.25 0.25

K_POINTS {crystal_b}
5
  0.0000 0.5000 0.0000 20  !L
  0.0000 0.0000 0.0000 30  !G
  -0.500 0.0000 -0.500 10  !X
  -0.375 0.2500 -0.375 30  !U
  0.0000 0.0000 0.0000 20  !G
运行命令:pw.x < pw.bands.silicon.in > pw.bands.silicon.out
说明:运行这个命令之前,需要先运行前面的 pw.scf.silicon_bands.in 文件,且输出文件为同一个文件夹,这里为 ./tmp,因为计算能带需要用到前面的结果。
pp.bands.silicon.in 输入文件:
&BANDS
  prefix = 'silicon'
  outdir = './tmp/'
  filband = 'si_bands.dat'
/

K_POINTS {crystal_b}
5
  0.0000 0.5000 0.0000 20  !L
  0.0000 0.0000 0.0000 30  !G
  -0.500 0.0000 -0.500 10  !X
  -0.375 0.2500 -0.375 30  !U
  0.0000 0.0000 0.0000 20  !G
运行命令:bands.x < pp.bands.silicon.in > pp.bands.silicon.out
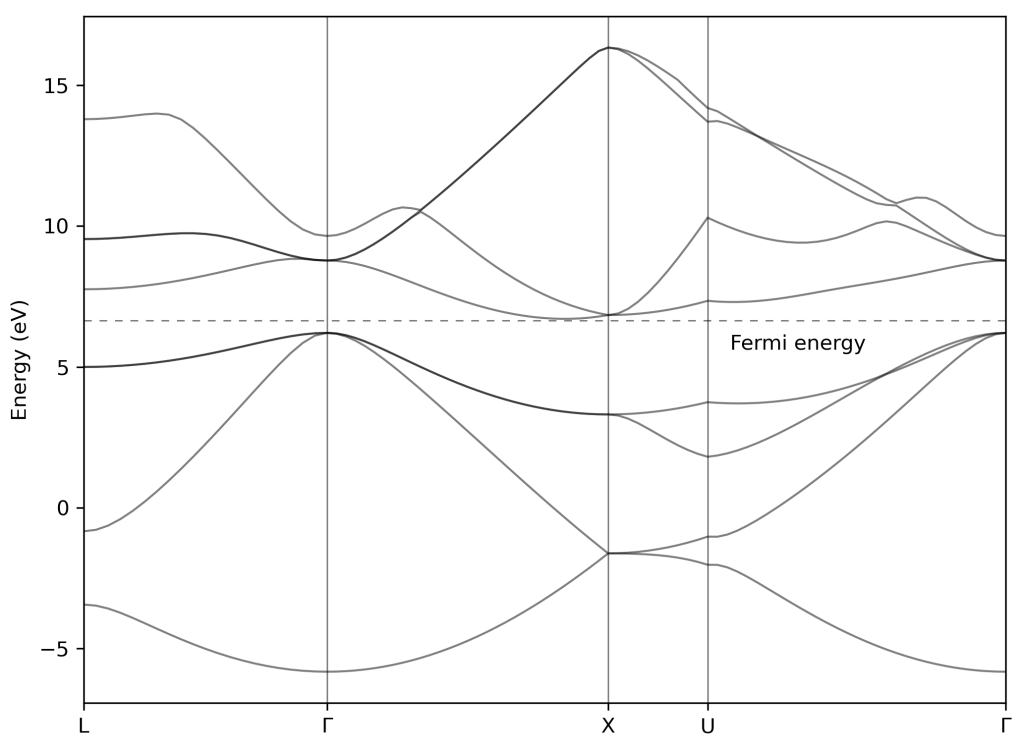
使用 Python 代码画图(用到 si_bands.dat.gnu 数据):
import matplotlib.pyplot as plt
import numpy as np

plt.rcParams["figure.dpi"]=150
plt.rcParams["figure.facecolor"]="white"
plt.rcParams["figure.figsize"]=(8, 6)

# load data
data = np.loadtxt('./si_bands.dat.gnu')

k = np.unique(data[:, 0])
bands = np.reshape(data[:, 1], (-1, len(k)))

for band in range(len(bands)):
    plt.plot(k, bands[band, :], linewidth=1, alpha=0.5, color='k')
plt.xlim(min(k), max(k))

# Fermi energy
plt.axhline(6.6416, linestyle=(0, (5, 5)), linewidth=0.75, color='k', alpha=0.5)
# High symmetry k-points (check bands_pp.out)
plt.axvline(0.8660, linewidth=0.75, color='k', alpha=0.5)
plt.axvline(1.8660, linewidth=0.75, color='k', alpha=0.5)
plt.axvline(2.2196, linewidth=0.75, color='k', alpha=0.5)
# text labels
plt.xticks(ticks= [0, 0.8660, 1.8660, 2.2196, 3.2802], \
           labels=['L', '$\Gamma$', 'X', 'U', '$\Gamma$'])
plt.ylabel("Energy (eV)")
plt.text(2.3, 5.6, 'Fermi energy')
plt.savefig('si_bands.jpg')
plt.show()
运行结果:

【说明:本站主要是个人的一些笔记和代码分享,内容可能会不定期修改。为了使全网显示的始终是最新版本,这里的文章未经同意请勿转载。引用请注明出处:https://www.guanjihuan.com】
大佬,想问一下安装过程中make all之后出现这种情况怎么解决啊
--2022-02-25 17:14:41-- https://gitlab.com/max-centre/components/devicexlib/-/a
rchive/0.1.0/devicexlib-0.1.0.tar.gz
Resolving gitlab.com (gitlab.com)... 172.65.251.78, 2606:4700:90:0:f22e:fbec:5bed:a9b9
Connecting to gitlab.com (gitlab.com)|172.65.251.78|:443... failed: Connection timed out.
Connecting to gitlab.com (gitlab.com)|2606:4700:90:0:f22e:fbec:5bed:a9b9|:443... failed: Network is unreachable.
% Total % Received % Xferd Average Speed Time Time Time Current
Dload Upload Total Spent Left Speed
0 0 0 0 0 0 0 0 --:--:-- 0:02:07 --:--:-- 0curl: (7) Failed to connect to 2606:4700:90:0:f22e:fbec:5bed:a9b9: Network is unreachable
gzip: stdin: unexpected end of file
tar: Child returned status 1
tar: Error is not recoverable: exiting now
make[2]: Entering directory `/home/bysj/tzwei/QE/qe-7.0/external/devxlib'
make[2]: *** No rule to make target `clean'. Stop.
make[2]: Leaving directory `/home/bysj/tzwei/QE/qe-7.0/external/devxlib'
/bin/sh: line 9: ./configure: No such file or directory
make[2]: Entering directory `/home/bysj/tzwei/QE/qe-7.0/external/devxlib'
make[2]: *** No rule to make target `all'. Stop.
make[2]: Leaving directory `/home/bysj/tzwei/QE/qe-7.0/external/devxlib'
make[1]: *** [libcuda_devxlib] Error 2
make[1]: Leaving directory `/home/bysj/tzwei/QE/qe-7.0/install'
make: *** [libcuda] Error 2
我也不清楚,忘了当时有没有遇到这个问题了。可以查下configure这个文件,或者清理后从头操作一遍,或者别处看看有没有解决方法。
可以更新些关于hubbard model 方面的知识嘛
这个目前还没怎么去研究,之后如果有了解可能会写。我这边贴出的都是偏简要的内容,建议还是阅读下相关的文章或者综述文献,收获会更多些。